Monday 29 December 2014

How to monitor network usage in Linux using Slurm

Slurm  shows network activity for a given interface. Total uploads and downloads are shown together in text and ASCII graphics. Data updates every second by default, and the graph scrolls from left to right according to network usage.

Installing slurm

Slurm is available in the repositories. In Ubuntu/Xubuntu/Linux Mint, simply install from the command line.
sudo apt-get install slurm

Running slurm
Monitor a wireless network device
slurm -i wlan0
Monitor a wired NIC
slurm -i eth0
Monitor a Data card/Dongle 
slurm -i ppp0

Slurm Display


here green indicates downloads (RX), and red indicates uploads (TX). Each vertical column, red or green, represents one second of time by default. 

Monday 22 December 2014

How to create WIFI Hotspot in Ubuntu 14

Below I have shown you how to use  default network manager to create a wireless hotspot in Ubuntu 14.04 To share Internet from Laptop to Mobile or other laptop.


1. Disable WIFI and plug in an internet cable or USB Dongle to your laptop so that your Ubuntu is connect to a  internet and wireless is disabled,
2. Go to Network Icon on top panel -> Edit Connections …, then click the Add button in the pop-up window.

3. Choose Wi-Fi from the drop-down menu when you’re asked to choose a connection type:


 4. In next window, do:
  • Type in a SSID
  • Select mode: Infrastructure
5. Go to Wi-Fi Security tab, select security type WPA & WPA2 Personal and set a password.
6. Go to IPv4 Settings tab, from Method drop-down box select Shared to other computers.

When done, click the save button.
After above steps, a configuration file created under/etc/NetworkManager/system-connections directory. File name is same to the connection name 
7. Now open terminal.  paste the commands below and hit enter to edit the configuration file:

gksu gedit /etc/NetworkManager/system-connections/Wi-Fi\ connection\ 1

if gkus command not found, install it by running command 
$sudo apt-get install gksu 

 When the file opens, find the line mode=infrastructure and  change it to mode=ap and save it 


When everything’s done, enable WIFI from Network Manager icon on the top panel. It should automatically connect to the hotspot  you created. If not, select “Connect to Hidden Wi-Fi Network …” and select it from the drop-down box. Now you can connect Internet through any WIFI      device 


how to Install Joomla step by step

Installing Joomla!

Prerequisites

You will need to install apache2, mysql-server-5.0, mysql-client-5.0 and php5 in order to have a web-server for Joomla!.

Which stack should I choose?

- XAMPP automatically configures ownership.
- LaMp requires use of the CHOWN command,
- BitNami Joomla! Stack is free, self-contained and automatically configures the LAMP stack and Joomla!


XAMPP

Step 1: Download
Download XAMPP for Linux to your your Home folder.
Step 2: Installation
After downloading simply type in the following commands:
  1. Go to a Linux shell and login as the system administrator root:su
  2. Extract the downloaded archive file to /opt:tar xvfz xampp-linux-1.8.1.tar.gz -C /opt
    Warning: Please use only this command to install XAMPP. DON'T use any Microsoft Windows tools to extract the archive, it won't work.
    Warning 2: already installed XAMPP versions get overwritten by this command.
That's all. XAMPP is now installed below the /opt/lampp directory.

 Step 3: Start

To start XAMPP simply call this command:
/opt/lampp/lampp start
You should now see something like this on your screen:
Starting XAMPP 1.8.1...
LAMPP: Starting Apache...
LAMPP: Starting MySQL...
LAMPP started.
Ready. Apache and MySQL are running.

Step 4: Test

OK, that was easy but how can you check that everything really works? Just type in the following URL at your favourite web browser:
The index.php will redirect to
http://localhost/xampp
Now you should see the start page of XAMPP containing some links to check the status of the installed software and some small programming examples.


IMPORTANT FILES AND DIRECTORIES
File/DirectoryPurpose
/opt/lampp/bin/The XAMPP commands home. /opt/lampp/bin/mysql calls for example the MySQL monitor.
/opt/lampp/htdocs/The Apache DocumentRoot directory.
/opt/lampp/etc/httpd.confThe Apache configuration file.
/opt/lampp/etc/my.cnfThe MySQL configuration file.
/opt/lampp/etc/php.iniThe PHP configuration file.
/opt/lampp/etc/proftpd.confThe ProFTPD configuration file. (since 0.9.5)
/opt/lampp/phpmyadmin/config.inc.phpThe phpMyAdmin configuration file.

Stopping XAMPP

To stop XAMPP simply call this command:
/opt/lampp/lampp stop
You should now see:
Stopping LAMPP 1.8.1...
LAMPP: Stopping Apache...
LAMPP: Stopping MySQL...
LAMPP stopped.
And XAMPP for Linux is stopped.

 To Uninstall

To uninstall XAMPP just type in this command:
rm -rf /opt/lampp 
Get Joomla
Step 1: Download
Download the latest Joomla installation zip HERE
Unzip to your hard drive 
Copy entire joomla folder to /opt/lampp/htdocs/
Now Open Web and Type http://localhost/joomla
Follow joomla installation steps.

Choose language:


Pre-installation check:


Joomla license agreement:


Joomla database configuration:
select mysql, username-"root"
password - if you have not set leave blank   


FTP configuration: Leave Blank if not required  


Main configuration 


Finish:
Remove “installation” directory.


Test Joomla 

Open your new website's administration page by entering the address such as 'localhost/joomla/administrator' in the web browser url.
Key in joomla's administrator username and password.


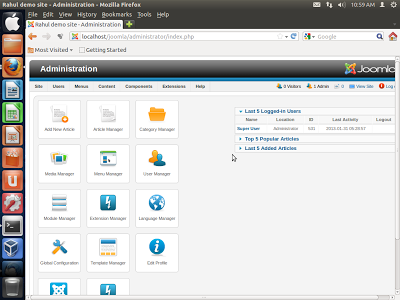
Here's Joomla administration menu page:


Joomla Main Page:
                     

That's all. What you have to do next is to set up your website. Joomla provides sample data that you can use as an example on how your website can be. You can use that as a guide. My personal opinion, to set up a website using Joomla cms is very easy. good luck!
Enjoy............

Calendar of September 1752

This particular month has something special. If you type cal 9 1752 on any Unix command line to get a calendar of this particular month you’ll get this output:
   September 1752
 S  M Tu  W Th  F  S
       1  2 14 15 16
17 18 19 20 21 22 23
24 25 26 27 28 29 30


Run in Linux Terminal "cal 9 1752"
Not a typical calendar by any means! Where have gone the days between September 2 and 14? Answer: September 1752 is the month Britain switched from the Julian calendar to the Gregorian calendar.
This means that dates prior September 1752 should be calculated according to the Junian calendar right? This is where it gets confusing: not all countries have switched at the same time.
So when you have an old date, you should make sure you know which calendar to use before doing any calculation with it.,

Wednesday 5 November 2014

How to do Linux routing !basics

Linux routing basics


Most of the people doesn’t know that linux/*nix systems can be used as routers. Even there is a project called Linux routing and separate Linux OS for routing purpose alone, that’s the flexibility of Linux. In linux/*nix every work can be done in two ways.
That is one temporary way(after reboots these changes will not be there) and
the other is permanent way(after reboots too the changes will be there).
Creating routes in Linux : Basic Linux routing 
Add a route to a network
#route add -net network/mask gw default-gateway 

Example 

#route add -net 10.10.10.0/24 gw 192.168.0.1

Or

#route add 10.10.10.1 gw 192.168.0.1
Adding default gateway
#route add default gw default-gateway
Example 
#route add default gw 192.168.0.1 
Adding a route to specific host
#route add -host host-name gw default-gateway 

Example:

 #rotue add -host 2.34.5.6 gw 192.168.0.1Or

#route add 2.34.5.6 gw 192.168.0.1
Deleting route to a network
#route del -network network/subnet default-gateway

Example 

#route del -net 10.10.10.0/24 gw 192.168.0.1
Deleting default gateway
#route del default gw default-gatway
Example :
#route del default gw 192.168.0.1
Deleting specific host from routing table
#route del -host ip-add gw default-gateway
Example 
#route del -host 10.10.10.45 gw 192.168.0.1
Seeing routing table
#netstat -rn
#route -n 
Note : The old gate way will still remain and may need to be taken out for the system to function properly. Routes are made permanent in Red Hat Linux by adding routes to/etc/sysconfig/static-routes.

Sunday 1 June 2014

How to create User without password in Linux

Below mentioned command can create user without password in Linux using single command.

Note: having an account without password might be a security threat. I recommend to only enable the account when needed,
useradd -p "" (username)
Sample as below......
#useradd -p "" rahul 

Now you can trying login using rahul user system will not ask for password.

Monday 12 May 2014

How to Recover Mysql root password

Recover Mysql root password


One of the very worst scenarios for a system administrator is when they forget a password for the root account. That is the same case when a Database admin does the same for the root account for Mysql Database. So to help here, these are the following steps which one can perform to recover the root password back for Mysql database.

Stop Mysql Server:
$ sudo /etc/init.d/mysql stop

Then, start the mysql server with skip-grant-tables options. –skip-grant-tables option will force the mysql process not to read the user table into memory, so that when you try to login to the Mysql server, it won’t ask for the password.
$ sudo mysqld_safe --skip-grant-tables  &

Now connect to mysql server using mysql client without giving any password
$ mysql -u root -p

Now setup the new password for the root user:
mysql> use mysql;
mysql> update user set password=PASSWORD("NEWPASSWORD") where user="root";
 mysql> flush privileges;
 mysql> Ctrl+D [to exit]

Now stop the mysql server
$ sudo /etc/init.d/mysql stop
Now start the mysql server normally, so that it could read the password information.
$ sudo /etc/init.d/mysql start